I am obsessed with all things DIY.

I see it,

I love it,

I make it.


Wednesday, April 27, 2016

South Park Christmas door


Christmas Door Decorating Contest 2015


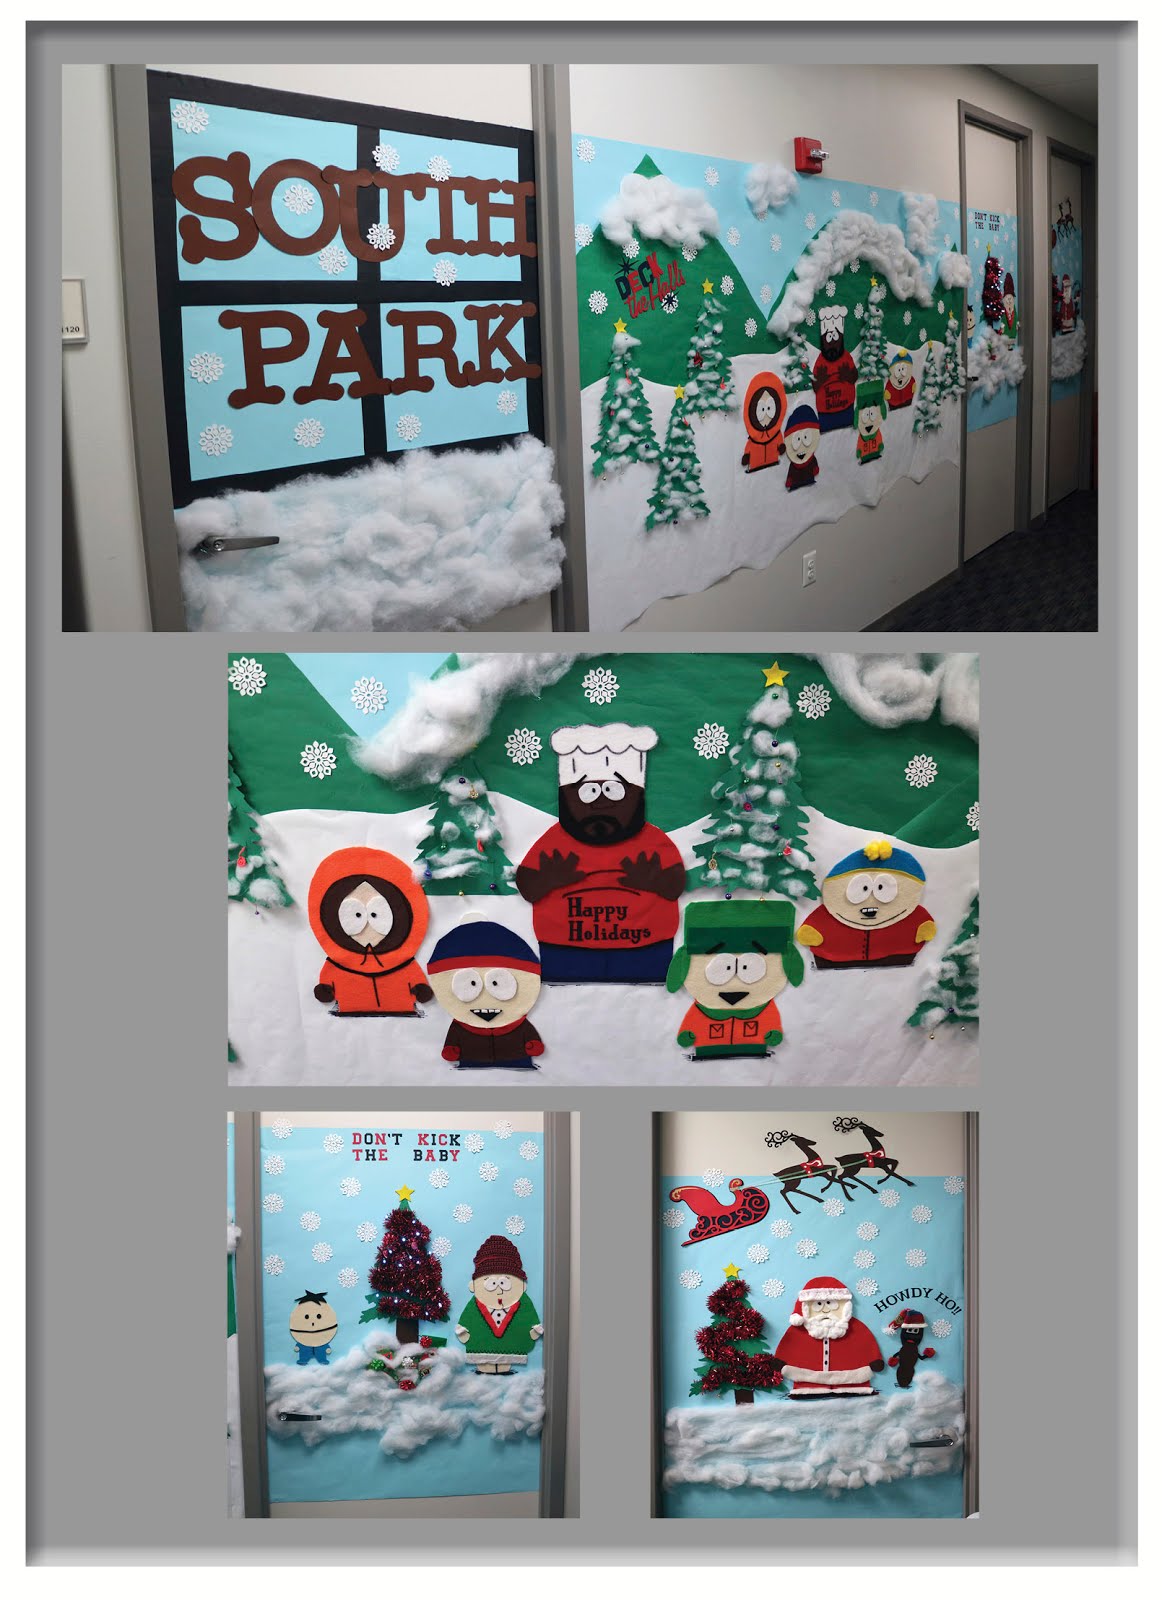
My company hosts the Actionet Annual Door Design Competition every Christmas where employees are asked to bring forth their skills to create a door worthy of winning.  I have the pleasure of being in the presence of 2 other creative masterminds in the payroll department.  My supervisor Crystal, who let's just get this out of the way, is fucking awesome, is a Cricut/Scrapbook/all around creative person.  Maribel shares an office with me and is amazing at knitting/crocheting/questioning my vision and is always the clencher once the doors are close to being done.

Going into the 2015 contest we had already won 2 years in a row and was looking for the next idea for our annual door design.  The concept for the design is usually something I've seen on Pintrest or from a person who inspires me.  I have an annoying coworker who sounds like Eric Cartman from Southpark every time she starts to complain.  So one day I started to do his voice (I do a spot on Cartman impression) and decided that was our concept.  I started searching the web for inspiration and found this picture when I googled Southpark Christmas:


My design process goes down fairly quickly.  Using the photo for inspiration I figured out the space I had available which was 3 doors and a connecting wall.   I buy rolls of paper from Ikea since its cheap but also serves as sketching paper and used for making patterns.  I did a rough sketch of my ideas along with supplies that I was going to need.  I find this is absolutely crucial to my design process because I have ideas flowing at 100mph so I have to write it down somewhere.  I hung the sketches on my office wall so anytime I remembered something or remembered a supply I would need I could jot it down immediately.

I decided to have a South Park sign on the first door and the inspiration picture as the main wall.  The other two doors I wanted Mr. Hankey the Christmas Poo and Santa on but I was struggling with another character to use.  I thought Mr. Garrison and Mr. Hand would be cool until I told my coworker about him and his uh proclivities.  She did not want him on the door so I had to think about someone else instead.  It was only September so I had a few months to marinate on that. 

So these are my sketches:


Watching Michaels coupons like a hawk I managed to score a 20% your entire sale coupon and went to stock up on supplies.  I made a list of all the colors I was going to need for my characters and bought a fuckton of felt.  I made sure to get a few of each so I wouldn't have to go buy more.  I purchased white, black, tan, cream, brown, red, dark green, light green, turquoise blue, yellow, red, and orange.

My boss purchased bulletin paper at a teacher's store in dark green, light blue, and white.  The teacher stores frequently have coupons and was cheaper than Michaels for the background paper.  I try to use what I have already rather than purchase a lot of supplies.  Crystal keeps Scor tape in bulk and that is what I use to affix everything to the walls, doors, and poster board.

Supply List

Felt in multiple colors
Bulletin Board Paper in light blue, green, and white here and here
Black Big Sharpie here and here
6 Poster boards (buy at the dollar store they are 2 for $1)
Scor tape here
2 bags of fake snow
Cricut machine
Scrap book paper
Christmas tinsel
Battery powered Christmas mini-lights
Mardi Gras beads
Thread
Scissors
Picture of each character blown up on a copier to scale size
Cotton balls
Santa hat from the dollar store

I googled each character I was planning on putting up and used my copier machine at work to blow up each picture to scale.  I cut each character out and taped the template to a piece of poster board.  I managed to get 3 characters out of each poster board but depending on the size you are going for this may vary.  I cut out the different pieces from each character starting with their faces, eyes, eyebrows, hats, and shirts.  Using the paper template I started cutting out the different pieces for Kyle shown below:


Once I had the pieces cut out I used the Scor tape to start assembling Kyle.  I always start with the largest piece this being the orange felt used for his shirt.  I layered his face on top and it just looked all types of wrong.  I cut the felt down a little bit so it would fit on top of his shirt.  I added his hat, eyes, mouth, teeth, and eyebrows next.


I started on Stan, Cartman, and Kenny.  It took the better part of my Saturday to complete the four characters.  The details were done with the big sharpie but everything else is felt only.  I was worn out and retired for the rest of the weekend.  I am a perfectionist and every detail has to be right on point.  Have the pictures handy so you can duplicate everything trust it will make life easier than looking it up on your phone every 5 mins.


The following weekend I started on Chef, Sheila Brofloski, Ike, and Santa:


My coworker knit Sheila's hair using maroon yarn and it came out amazing.

I measured the bulletin paper on the big wall and started with the sky so used the light blue.  Secured that to the wall using Scor tape.  I roughly sketched out the mountains on the dark green paper and applied that over the blue.  Using the fake snow I started working on the snow for the mountain tops and clouds. 


I know it doesn't look like much right now but Chef needed to find a home


Then the boys needed a new home


I started adding in details such as trees Crystal had cut out using the Cricut machine. The pattern had space to add in pieces of the fake snow so I decorated them.  Maribel knitted little ornaments and made smaller ornaments using a Mardi Gras beaded necklace, hot glue, and some string.  I finished each tree off with a yellow star.  Crystal also cut out snowflakes so I put all of that up to finish the main wall.


The first door was made using the Cricut machine to cut out the letters for South Park.  We carried over the snow flakes to make the design cohesive.  I used fake snow to help cover the door knob area so it didn't stick out like a sore thumb.  The window frame was black poster board.


On the first season of South Park Kyle was really upset with his adopted brother Ike and started a "Kick the Baby" game.  He would literally punt his baby brother around.  So that's where I came the concept for my door.  I added a Christmas tree with battery powered lights and a star to set that off nicely.  I used the snow flakes as well and letters cut out from the Cricut (again). 


The last door was so amazing.  Crystal cut Mr. Hankey out of scrap book paper along with the reindeer/sleigh.  Santa fit his chunky ass in there nicely.  Maribel knitted the hat and gloves for Mr. Hankey and didn't realize it was for a piece of shit, literally.  She asked what he was supposed to be and laughed so hard about it.  


 So that's how I came up with the awesomeness that is known as South Park Christmas.  We won for the third year in a row.  Now comes the burden of making something even more amazeballs for 2016.  Thankfully I have a few months.


Tuesday, November 4, 2014

New items in my Posh Store


I just finished moving a few weeks ago and have a confession to make.  I'm a hoarder.  Of clothes, shoes, jewelry, and purses.  So what is a hoarder to do when you are surrounded by stuff?  Get rid of it!!!  I literally have bins and bins of clothing that needs to be sold.  

I recently scored a Plus Size Mannequin off of Craigslist that lived the first part of her life in Macy's.  It literally is a game changer for my online sales.  The clothing looks professional as shit like I'm a stylist over here!  I'm enjoying having my Big Boobie Girl in my house until I come into my room and she scares the living crap out of me!  I haven't named her yet so for now she's BBG.

Here a few new items in my store:


Monday, August 4, 2014

The Elephant in the room


My parents purchased a beautiful 6 bedroom, 3 bathroom, 2 level home in the country a few months ago that was decorated in what I like to refer to is Country Hoarding.  The owners of the home ran some kind of decorating business and it appears that 90% of the merchandize ended up on their walls.  There was literally no space or wall in the house that wasn't accessorized with something. 

 
In the den aka Man Cave was a stuffed bear, a mounted deer head, and other assorted dead things.  After much deliberation we decided that the Man Cave would be a play room for the grandchildren.  Keeping the feel of the country house was essential to the room and decorating it was no small task.  

Mom who is a master organizer purchased these from Ikea to hold all of the kids assorted play items.  


The buckets come in 4 different sizes and range from $2 - $5 a piece.  The slide tracks are adjustable so you can personalize each one for your needs.  The frames themselves come in different sizes and finishes as well.  Head on over to Ikea to check out the different options.  

We started by using the bins to put like items together.  We ended up with a bin for legos, balls, trains, matchbox cars, blankets (you know for the play fort!), and everything else we could find.  The kids love costumes so they have assorted ones including a football player.  There was a Dallas Cowboys helmet that was now too small for either of my nephews so we decided to hang it on one side of the wall instead of tossing it out.  We added an inexpensive desk from Ikea that we already had for an arts and crafts station.


We had a cute little table that had a scratched surface.  So I went by Michael's and got chalkboard paint.  I taped off the sides of the table and sprayed the top.  Viola chalkboard table!  I found the little buckets at Target for a dollar and they hold the chalk for their upcycled table. This project literally took 15 minutes. 


I was on Pintrest and had seen this awesome stuffed animal head on the iLoveToCreate Blog that I was all over:

Hello there!

I collected stuffed elephants since I was a child so I didn't actually have to purchase one for this project.  You can use any stuffed animal you choose I just wanted to give my old animals a new life sort to speak, later on that.  

I went by Lowe's and purchased a pre-cut round pine base for my project.  It was $7 after my mom's military discount.  I picked up two cans of spray paint in Dallas Cowboys Navy and Gray to paint the base.  I also snagged some painters tape and E6000 Industrial Strength Glue while I was at Lowe's.


Elephant Head Mounting 

Supply List:

Stuffed Animal, obviously an Elephant in this tutorial
Pre-cut Round Pine Base
Scissors
Navy Spray Paint
Gray Spray Paint
Painter Tape
Piece of a cardboard box
E6000 Glue
Staple Gun
Hanger for the back

Step 1 - Prepare base by wiping off any dust from the base.  Spray with 2 coats of the Gray Spray Paint.  Let the coats dry in between for a good hour.  After coat 2 let dry over night.

Step 2 -  Starting at the bottom of the base tape a solid line across.  I used a small piece of tape as a guide for the next stripe.  Continue taping until you are done with the base.  You may have to piece around the edges because of the roundness. 

Step 3 - Spray 1 coat of the Navy Spray Paint over the base.  Depending on the paint you use this may need 2 coats.  Let it dry for an hour or so.  If you can see the grey through the base you need another coat.  If not, you're good to go.  FYI, always pay for the better quality spray paint.  

Step 4 - Remove the tape carefully from the base.  You should have some seriously awesomeness when you are finished. 

Step 5 - Not for the faint of heart, just be warned.  Take your stuffed animal and decapitate him.  Gruesome yes, worth it definitively!  I actually cut him under the legs to give me room to work with.  Be aware he's going to bleed, stuffing that is!  It's kinda messy so do this over a trash can if possible.  You should be left with his head and I threw away the rest of him, I had no use for his butt!

Step 6 - Cut out a piece of cardboard big enough to shove into the hole in his back.  You are going to use this to bond the head to the base.  Its easier doing it this way trust me.  I tried to glue him to the piece of cardboard at first, craft FAIL!  My mom recommended doing it this way and for once I listened.  Thanks mom!

I used the E6000 to glue all his edges to the cardboard so there is only a small opening in the back that is the cardboard.  If there are places that the glue won't stick because of the stuffing, try using a staple gun to get him nice and flat on the cardboard.  Make sure you do this in a well ventilated area, E6000 is potent!  After you are satisfied let the glue dry/set for a while. 

Step 7 - Using the E6000 glue the cardboard to the wood base.  I used a few heavy books to help hold the head in place while it dried.  Let this dry for a while too. I put in staples around the perimeter to give it extra support.  Don't worry the fur will hide the staples.

Step 8 - Using a picture hanger, nail the sucker on the back so you can hang your one of a kind masterpiece on the wall.

Came out too cute!  My stuffed elephants had been in storage for probably close to 15 years maybe longer.  I loved them so much when I was a child that I had a hoarder episode meltdown every time I tried to get rid of them.  I feel this was the best way to give them a new life.  I'll see how the kids react to him.   


Thursday, February 13, 2014

DIY Animal Keychains


After making my Animal Jars I ended up with a bunch of left over animals but had no clue what to do with them.  I was on Pintrest today and saw this tutorial by Ginger Snaps on making DIY Animal Keychains.....

what you need: plastic animal(s), small screw eye hook, paint/brush, key ring, *optional: clear sealant spray or clear nailpolish, safety pin, small bowl

I bought a new batch of animals because a coworker wanted a elephant so I used a 40% off coupon from Michaels to get them. 

This is my selection of animals that I am going to work with.  I decided on the parakeet, elephant, chimpanzee, giraffe, panda, corgi, polar bear, and rat.   
Next I got all my supplies together so I could get started.  I purchased Martha Stewart High Gloss in Black and Sea Glass in Satin.  I also picked up Glitter Acrylic Paint from Martha to jazz up the overall look of the key chains.  I bought a pack of Metallic Sharpies for decorating. 
 Let's get to painting!
You lookin at me?

Before


These are one coat of paint.  Some of the animals will only need one or two coats.  The giraffe and elephant required 4 coats.  Be patient and let each coat dry thoroughly before applying the next coat.
 3 coats of paint
After 2 coats of paint

Mr. Polar Bear only required 2 coats and I was anxious to see how the glitter was going to turn out so I applied a coat to  him.  The 2nd picture is after one coat.  Didn't really do too much but I let this coat dry and applied 3 coats of the glitter.

Time to switch to the animals that will be painted black.  I selected the chimp, gator (which I added later), and rat to paint black.


The animals painted black only required one coat of paint.  I let them dry for 4 hours once all the animals were evenly painted then cruised Pintrest looking for decorating ideas.  I found a few things but decided to go with the flow of each animal. 

Once they were all decorated it was time to put the small screw eye hook into the animal.  I used a safety pin to start the hole I found it was easier this way.


 I grabbed a pair of pliers to assist with the turning of the screw because just be warned it will hurt your fingers after you do a few.


After the gator had his screw I grabbed a key ring and slid it through the hook.  So the pictures below are the finished products.  I think they turned out fabulous!!!